
A while ago I wrote a blog post comparing two approaches to the all new and shiny Flux architecture The comparison included reference implementation as described by its authors at Facebook and one of the many alternatives - the Reflux, created by Mikael Brassman. At the time, new implementations of the Flux pattern were springing up at an astonishing pace: Flummox, alt, Fluxxor, to name just a few of countless examples. At some point, one of the libraries started getting a lot of traction in the community and gained the status of a de facto standard. The library I have in mind is of course Redux, created by Dan Abramov. While many of the alternative libraries are still developed and can be a a great option to use in your application, there’s no doubt that Redux has become a weapon of choice for most of the React developers in need of a state management solution. In this post we’ll take a look at features that made Redux stand out from the crowd. We’ll also build a simple app to demonstrate how it differs from the alternatives. We’ll also learn about some good patterns that are not mandatory but can be very helpful for writing maintainable code.
What is Redux and why should I care?
As its github page states:
Redux is a predictable state container for JavaScript apps.
Redux borrows many concepts from functional programming. Pure functions, data immutability and higher order functions and currying - to name a few, are deeply ingrained in the library.
It was especially heavily inspired by Elm - a functional language that compiles to JavaScript, widely praised for its design, tooling and architecture.
Basic concepts
Before we get our hands dirty with the code, let’s quickly summarize the basic concepts of Redux.
- All data is kept in a single store. It takes a form of an object. No matter the application size, it’s always just a single object. This is different from the Flux, where it’s possible (and generally advised) to create separate stores for each kind of data.
- State is immutable. If the application performs some manipulations on the data, for example upadtes an item in the to-do list, the state is not modified. Instead, a new state tree is created based on the existing one. This might seem counterintuitive at first. Copying whole application state on each action sounds like it must be terribly slow. In reality, that’s not the case. Most of the data can be shared between multiple versions of the state tree. This presentation by Lee Byron, author of Immutable.js library, touches on this topic in much greater detail.
-
The only way to update application state is through actions. Actions are just plain objects, which must contain a
typeproperty indicating the kind of action. They can also include any additional data that is necessary to describe the action. An example of Redux action might be something like this:{ type: 'add_item', item: 12 }. Actions are dispatched by the store’sdispatch()method. -
When an action is emitted, it’s passed to a reducer, together with the current state tree. Reducer is a pure function that transforms current state into new state, based on the action. Usually it consists of a switch statement that decides what to do based on action’s
typeproperty. Redux providescombineReducersfunction, which helps greatly with modularizing the code. It lets us define multiple small reducers, that handle only single branch of a state tree, and combines them into a single reducer.
Alright, let’s see it in practice!
We will build an app similar to the one I used for demonstrating differences between the original Flux implementation and Reflux. It will be a extremely simple budget management tool, allowing its users to add entries for incomes and outcomes and display balance. The users will also be able to categorize entries and filter the balance according to categories.
The code can be found in this repository.
We’ll start by initializing the application and installing the react-redux and a bunch of other libraries we’ll use from npm.
# ignore the below line if you already have create-react-app installed
➜ npm install -g create-react-app

➜ create-react-app redux-budget
Creating a new React app in /home/kamil/Downloads/redux-budget.

Installing packages. This might take a couple minutes.
Installing react-scripts from npm...

# ...

Success! Created redux-budget at /home/kamil/Downloads/redux-budget

➜ cd redux-budget
➜ npm i redux react-redux lodash reselect node-uuid --save
At this point we should start development server wiht npm start command and check if there are no errors.
Next, we’ll adjust the project structure a bit. We’ll create three directories inside src:
components- for React componentsducks- many projects use structure that groups code by its type - for example there are directories calledactionsorreducers. An alternative is to group the code by functionality it’s related to. That’s what the ducks pattern is about. In short, it’s about bundling all the code (action creators, reducers, selectors) related to a single functionality in a module.store- where we’ll initialize our Redux store. This is also where middlewares could be placed if we needed to use any.
➜ mkdir src/{components,ducks,store}
➜ cd src
➜ mv App.js components
Depending on the project there might be more directories, for example stylesheets, but given the simplicity of our sample application, the above will suffice.
We’ll also include bootstrap in the public/index.html file, to make our app a bit nicer to look at:
<link rel="stylesheet" href="https://maxcdn.bootstrapcdn.com/bootstrap/3.3.5/css/bootstrap.min.css">We could use the power of webpack to include the css in our build, but since it’s not a topic of this post we’ll just link to externally hosted file to keep it simple.
The next step will be defining data model. As you might remember, the whole application state in Redux is always a single object, no matter what the size of the application is. In our case it will be as simple as this:
{
  entries: [
    {
      title: 'Entry Title',
      amount: 123.00,
      category: 'entertainment',
      timestamp: 'Mon Nov 28 2016 01:58:09 GMT+0100 (CET)',
      id: '20b80329-00ed-4659-851a-eb81f57e1c51'
    }, {
      ...
    },
  ],
  categories: {
    selectedCategory: 'salary',
  },
}
We will only have an array of entries existing in our application and a currently selected category which will be used for fitlering. We can also already predict the actions that we will want to perform: adding entries, removing entries and choosing a category that we want to limit our results to.
With this knowledge, we’re ready to define actions and implement reducers.
We will split them into two ducks: entries and categories.
// src/ducks/entries.js

import { v4 } from 'node-uuid'
import reject from 'lodash/reject'

// Actions
export function createEntry(attributes) {
  return {
    type: 'entry/create',
    payload: attributes,
  }
}

export function destroyEntry(id) {
  return {
    type: 'entry/destroy',
    payload: { id },
  }
}

// Reducer
export default function reducer(
  entries = [],
  { type, payload }
) {
  switch (type) {
    case 'entry/create':
      const { title, amount, category } = payload
      return [
        ...entries,
        { title, amount, category, id: v4(), timestamp: (new Date()) },
      ]
    case 'entry/destroy':
      return reject(entries, { id: payload.id })
    default:
      return entries
  }
}
It’s pretty straightforward: we can create an entry by providing title, amount of money and category. The ID and timestamp are generated automatically during the entry creation.
To delete an entry, we need to pass its id to the destroyEntry action creator.
Notice how our reducer never modifies the state that is passed to it - it always creates a copy. That’s what makes it a pure function.
Another fact worth noting is that each reducer should have a default case that returns the initial state. In the above case it’s just an empty array.
Now, let’s also have a look at the categories duck:
// src/ducks/categories.js

// Actions
export function selectCategory(category) {
  return {
    type: 'category/set',
    payload: category
  }
}

// Reducer
const defaultState = {
  selectedCategory: 'all',
}

export default function reducer(
  state = defaultState,
  { type, payload }
) {
  switch (type) {
    case 'category/set':
      return { selectedCategory: payload }
    default:
      return state
  }
}
As we only have one action in this duck, it’s even simplier than the previous one. All it does is keeping track of the currently selected category.
Finally, we will use a handy function that comes with redux: combineReducers.
With its help, we can merge multiple small reducers into a single one that manages the whole state.
// src/ducks/index.js

import { combineReducers } from 'redux'
import entries from './entries'
import categories from './categories'

export default combineReducers({
  entries,
  categories,
})
Now that we have our reducer ready, we can initialize the redux store.
The only parameter we need to pass to createStore is the reducer.
// src/store/index.js
import { createStore } from 'redux'
import rootReducer from '../ducks'
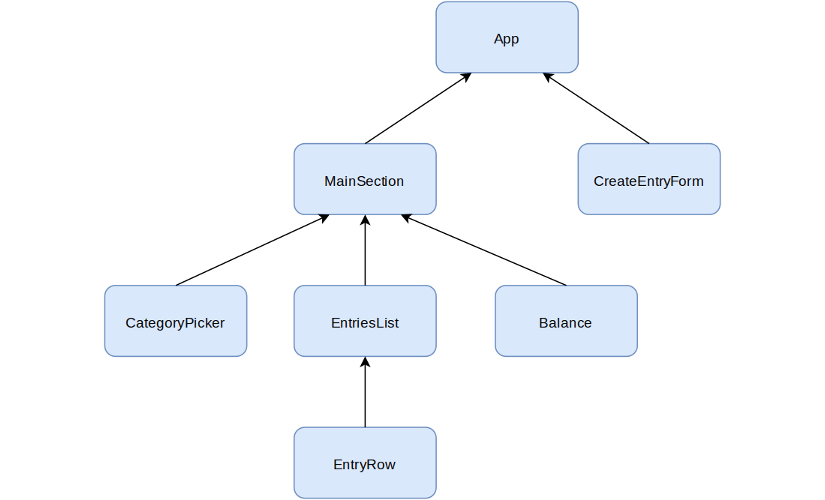
export default createStore(rootReducer)With the store in place, we can start adding views layer into the mix. Our React components will form the following hierarchy:
Let’s initialize the app in src/index.js file.
We’ll use the #root div, already included inside the index.html file generated for us by create-ract-app.
// src/index.js

import React from 'react';
import ReactDOM from 'react-dom';
import { Provider } from 'react-redux'
import store from './store'
import App from './components/App';
import './index.css';

const element = document.getElementById('root')

ReactDOM.render(
  <Provider store={ store }>
    <App />
  </Provider>,
  element
)
The most interesting thing here is the Provider component from the react-redux.
We wrap our top-level component inside it and pass our previously defined store as a prop.
It makes the Redux store available to connect() function calls in our components.
We’ll see what it means in a minute.
Now, let’s implement some actual components.
We’ll start with the top-level App.
There’s nothing particularly interesting about it.
It simply wraps some other components and gives our page a very basic structure by wrapping it inside a container and displaying header.
// src/components/App.js

import React from 'react'
import MainSection from './MainSection'
import CreateEntryForm from './CreateEntryForm'

export default function App() {
  return (
    <div>
      <div className="container">
        <h1>Budget App</h1>
        <MainSection />
        <CreateEntryForm />
      </div>
    </div>
  )
}
Let’s move one step down in the hierarchy. The next component we will take a look at is MainSection.
// src/components/MainSection.js

import React from 'react'
import { connect } from 'react-redux'
import { getSelectedCategory, getCategorysEntries } from '../ducks/categories'
import CategoryPicker from './CategoryPicker'
import EntriesList from './EntriesList'
import Balance from './Balance'

export function MainSection({ entries, selectedCategory }) {
  return <div className="row">
      <div className="col-md-12">
        <CategoryPicker />
        <EntriesList entries={ entries } selectedCategory={ selectedCategory } />
        <Balance entries={ entries } selectedCategory={ selectedCategory } />
      </div>
    </div>
}

export default connect(state => ({
  entries: getCategorysEntries(state),
  selectedCategory: getSelectedCategory(state),
}))(MainSection)
When describing the Provider component I mentioned that it makes the Redux store available to connect() calls in the component hierarchy below.
Here we can finally see a real life example.
connect() is a function that does exactly what its name suggests - it connects React components to a Redux store.
Here’s what its signature looks like:
connect([mapStateToProps], [mapDispatchToProps], [mergeProps], [options])(component)
Most commonly used parameters are mapStateToProps and mapDispatchToProps.
The first one is used to map data from redux store into props passed to the compnent.
The second one allows us to pass functions dispatching redux actions to component - again, as props.
The important thing to note is that connect() doesn’t modify the component that we pass to it, but instead returns a new component based on the original one.
This immutability is in line with the functional nature of Redux and has many advantages.
For example, it makes testing our components extremely easy: we just need to import our original component in the test and pass props to it, in the same manner as connect() would do.
Inside the mapStateToProps function, passed to connect() as a first parameter, we get a redux state (available to us thanks to wrapping components hierarchy in the Provider) and we should return an object representing the props that will be passed to the component. We could do that by simply accessing the property on the state object available in the function, like this:
entries = state.entriesHowever, in many cases it won’t be as trivial as that. What if we wanted to have slightly more complex logic for deciding which entries should be displayed? For example, we might (and do, in fact) want to define the rules as follows:
- If there’s no selected category, display all entries
- If there’s a selected category, display only entries that match it
We could put this logic inside the mapStateToProps function, but there’s a bunch of problems with this idea.
We bloat the component with data access, which it should not be concerned about; if we want to use the same piece of data in multiple places, we end up with duplicated code.
The solution to these issues is using selectors. Selector is just a function that operates on state tree and returns data derived from it.
The library I used in the example is Reselect.
It has a few nice features, such as out-of-the-box memoization (selector won’t be recomputed unless the data it’s based on changes) and composability.
The above component already uses two selectors: getCategorysEntries and getSelectedCategory. Let’s now see how they’re implemented in ducks:
// src/ducks/rootSelector.js

export function getRoot(state) {
  return state
}

// src/ducks/entries.js

import groupBy from 'lodash/groupBy'
import { getRoot } from './rootSelector'
import { createSelector } from 'reselect'

// ....

// Selectors
export const getEntries = createSelector(
  getRoot,
  ({ entries }) =>  entries
)

export const getEntriesByCategory = createSelector(
  getEntries,
  (entries) => groupBy(entries, 'category')
)

// ....

// src/ducks/categories.js
import { getRoot } from './rootSelector'
import { createSelector } from 'reselect'
import { getEntries, getEntriesByCategory } from './entries'

// ....

// Selectors
export const getCategoriesRoot = createSelector(
  getRoot,
  ({ categories }) => categories
)

export const getSelectedCategory = createSelector(
  getCategoriesRoot,
  ({ selectedCategory }) => selectedCategory
)

export const getCategorysEntries = createSelector(
  getEntriesByCategory,
  getEntries,
  getSelectedCategory,
  (entriesByCategory, allEntries, category) =>
    category === 'all' ? allEntries : entriesByCategory[category] || []
)

// ....
Next, we’ll implement the list of entries. It will consist of two components: EntriesList, which will build a table by simply iterating over all entries it will receive in props and EntryRow for displaying a single entry.
EntryRow will also include a link for deleting an entry.
This will demonstrate the usage of mapDispatchToProps: in the second parameter to connect() we define the onDestroyEntry function, which accepts entry id as a parameter and dispatches appropriate action.
The onDestroyEntry is passed to our component as one of the props.
// src/components/EntriesList.js

import React from 'react'
import EntryRow from './EntryRow'

export default function EntriesList({ entries }) {
  const entryNodes = entries.map((entry) => <EntryRow entry={ entry } key={ entry.id }/>)

  return <table className="table table-striped table-bordered">
      <thead>
        <tr>
          <th>Title</th>
          <th>Amount</th>
          <th>Category</th>
          <th>Date</th>
          <th></th>
        </tr>
      </thead>
      <tbody>
        { entryNodes }
      </tbody>
    </table>
}

// src/components/EntryRow.js

import React from 'react'
import { connect } from 'react-redux'
import { destroyEntry } from '../ducks/entries'

export function EntryRow({ entry, onDestroyEntry }) {
  return <tr>
      <td>{ entry.title }</td>
      <td className={ entry.amount > 0 ? 'success' : 'danger' }>
        { entry.amount.toFixed(2) }
      </td>
      <td>{ entry.category }</td>
      <td>{ entry.timestamp.toString() }</td>
      <td><a href="#" onClick={ onDestroyEntry.bind(null, entry.id) }>REMOVE</a></td>
    </tr>
}

export default connect(
  null,
  (dispatch) => ({
    onDestroyEntry(id) {
      dispatch(destroyEntry(id))
    }
  })
)(EntryRow)
Next, we’ll show the balance of the displayed incomes and outcomes.
There isn’t really anything new here: we use selector to read entries from the state tree and inside the component we calculate the sum of their amounts and display it.
// src/components/Balance.js

import React from 'react'
import { connect } from 'react-redux'
import { getCategorysEntries } from '../ducks/categories'

export function Balance({ entries }) {
  const total = entries.reduce((sum, entry) => sum + entry.amount, 0)

  return <div className="text-right">
      <span style={{fontSize: '1.6em'}} >
        TOTAL: <strong>${total.toFixed(2)}</strong>
      </span>
    </div>
}

export default connect(
  (state) => ({
    entries: getCategorysEntries(state),
}))(Balance)
Next comes the CategoryPicker. This component will display a dropdown with all the existing categories and the ‘All’ option.
The list of categories must be dynamic - when newly added entry introduces a category that didn’t exist before, we want it to immediately become available in the dropdown.
Similarily, when we delete the last entry from a category, there’s no need to include it in the dropdown anymore.
To achieve this behaviour we will introduce a selector that will return a list of categories based on existing entries and use this selector in our new component.
// src/ducks/categories.js

// ...

export const getCategories = createSelector(
  getEntriesByCategory,
  (entriesByCategory) => Object.keys(entriesByCategory)
)

// ...


// src/components/CategoryPicker.js

import React, { Component } from 'react'
import { findDOMNode } from 'react-dom'
import { connect } from 'react-redux'
import { getCategories, selectCategory } from '../ducks/categories'

export class CategoryPicker extends Component {
  constructor() {
    super()
    this.onChange = this.onChange.bind(this)
  }

  onChange() {
    const { onSelectCategory } = this.props
    const category = findDOMNode(this.refs.categoryFilter).value
    onSelectCategory(category)
  }

  render() {
    const { categories } = this.props

    const optionNodes = categories.map(
      category => <option key={ category } value={ category }>{category}</option>
    )

    return <div>
        Filter by category:
        <select ref="categoryFilter" onChange={ this.onChange }>
          <option value="all">All</option>
          {optionNodes}
        </select>
      </div>
  }
}

export default connect(
  (state) => ({
    categories: getCategories(state),
  }),
  (dispatch) => ({
    onSelectCategory(category) {
      dispatch(selectCategory(category))
    }
  })
)(CategoryPicker)
Last, but not least, we need to start adding entries. After all, our application is completely useless without any data.
// src/components/CreateEntryForm.js

import React, { Component } from 'react'
import { findDOMNode } from 'react-dom'
import { connect } from 'react-redux'
import { createEntry } from '../ducks/entries'

export class CreateEntryForm extends Component {
  constructor() {
    super()
    this.addEntry = this.addEntry.bind(this)
  }

  addEntry() {
    const { onCreateEntry } = this.props

    const transactionType = findDOMNode(this.refs.transactionType)
    const titleRef = findDOMNode(this.refs.title)
    const amountRef = findDOMNode(this.refs.amount)
    const categoryRef = findDOMNode(this.refs.category)

    const amountValue = parseFloat(amountRef.value)
    const amount = transactionType.value === 'income' ? amountValue : -amountValue

    onCreateEntry({
      title: titleRef.value,
      category: categoryRef.value,
      amount,
    })
  }

  render() {
    return <div className="row">
          <div className="col-md-12">
            <form className="form-inline">
              <select ref="transactionType" className="form-control" >
                <option value="income">Income</option>
                <option value="outcome">Outcome</option>
              </select>

              <input type="text" className="form-control" ref="title" placeholder="title" />

              <div className="input-group">
                <div className="input-group-addon">$</div>
                <input type="text" className="form-control" ref="amount" placeholder="amount" />
              </div>

              <input type="text" className="form-control" ref="category" placeholder="category" />

              <input type="button" className="btn btn-primary" value="Add" onClick={this.addEntry} />
            </form>
          </div>
        </div>
  }
}

export default connect(
  null,
  (dispatch) => ({
    onCreateEntry(attributes) {
      dispatch(createEntry(attributes))
    }
  })
)(CreateEntryForm)
Here, we simply display a form with a fields for transaction type, tile, amount of money and category. New entries are added to the store when the form gets submitted.
That looks cool, I want to learn more about Redux
For anyone wanting to expand their knowledge of Redux, the great starting point will be its official documentation. If you prefer videos to written text, Egghead.io has two great series of videos. After that you should get familiar with Redux Thunk, a middleware for handling asynchronous actions. Finally, I suggest having a look at “awesome-redux”, a huge list of redux resources maintained by Denis Stoyanov and picking topics you’re interested in from there.
- Redux Documentation
- Egghead.io - Getting Started with Redux
- Egghead.io - Building React Applications with Idiomatic Redux
- Redux Thunk
- Awesome Redux
What next?
The React ecosystem seems to be a much more welcoming place for newcomers than it used to be just a few months ago. From the enormous throng of contending technologies we came to the point where we have established standards and best practices that new developers can be pointed to. A big part of that is thanks to the release of the Create React App, but having Redux as a single go-to state management library is also an important factor. This greatly reduces so-called “JavaScript fatigue” experienced by people who want to enter JS ecosystem, or simply stay up to date. This also means that now is a great time to start learning React, if you haven’t done so yet.
While it seems that Redux popularity dimnished the excitement around new state-management libraries, the search for simpler, faster or more versatile solutions certainly didn’t end - it never will. One of the libraries that seems to be getting more traction these days is MobX, which might be a topic of a future post. Stay tuned!

Post by Kamil Bielawski
Kamil has been working with AmberBit since 2012, and is an expert on JavaScript and Ruby, recently working with Elixir code as well.